On our website, we're thrilled to showcase a treasure trove of tried-and-tested recipes from passionate bakers like you! The recipes are perfect for both newcomers and seasoned pros, these recipe offers a delightful journey into the world of baking. With detailed instructions and insightful tips, it guides you through each step with ease, ensuring success every time you bake. From mixing the dough to scoring and baking, every aspect is thoughtfully explained to empower you in the kitchen. Plus, it's backed by a community of fellow enthusiasts who have shared their experiences and tips, adding an extra layer of value and camaraderie. So roll up your sleeves, gather your ingredients, and let's embark on a baking adventure together!
Creating your first sourdough starter can take between 7 to 12 days, yet this guide is designed to simplify the process for you. With just a few minutes of dedicated attention daily, you will likely find the experience enjoyable and rewarding.


What You Need:
- Organic Rye Flour
- Organic Unbleached all-purpose flour.
- Lukewarm filtered water, no more than 85F.
- Our Kit
Day 1: Making Your Starter
- Record the Time, Date, and your jar's initial weight. (Utilize the Printable Daily Feeding Tracker)
- In a clean jar, combine 100g of organic rye flour with 150g of lukewarm filtered water.
- Mix thoroughly until the flour is fully absorbed. Let the mixture rest at room temperature for 24 hours period , away from direct sunlight.
Day 2: The First Feed
- Retain 70g of the starter from the previous DAY in the jar and discard the remainder.
- Add 50g of rye flour, 50g of unbleached all-purpose flour, and 115g of lukewarm filtered water.
- Mix thoroughly, then loosely cover the jar with a cotton cloth and let it rest at room temperature for 24 hours period.
Day 3: Feeding Again
- For today's maintenance, simply repeat the steps outlined for DAY 2.
Day 4: Adjusting Hydration
- Retain 70g of starter from the previous DAY in the jar and discard the remainder.
- Add 50g of rye flour, 50g of unbleached all-purpose flour, and 100g of lukewarm filtered water.
- Mix thoroughly, loosely cover the jar with a cotton cloth, and let it rest at room temperature for 24 hours period.
Day 5: Another Feed
- For today's maintenance, simply repeat the steps outlined for DAY 4.
Day 6: Preparing for Maintenance
- This time, retain 50g of the starter from the previous DAY in the jar and discard the remainder.
- Add 50g of rye flour, 50g of unbleached all-purpose flour, and 100g of lukewarm filtered water to the retained starter.
- Mix thoroughly, then loosely cover the jar with the cotton cloth and allow it to ferment at room temperature for 24 hours period.
Day 7: Maintenance Feeding
Your starter is nearly ready!
- Retain 25g of the starter from the previous DAY and discard the rest.
- Add 50g of rye flour, 50g of unbleached all-purpose flour, and 100g of room-temperature filtered water to the retained starter.
- After this feeding, your starter will need maintenance feedings once every 12-24 hours, ideally at the same time each DAY. If you plan to make bread less frequently, please see the tips for success below.
Day 8: and Beyond
- If your starter is ready, Congratulations! You've embarked on an amazing, adventurous journey of artisan homemade bread. If it's not ready yet, don't be disappointed—simply repeat step 7 until it achieves readiness. A mature sourdough starter is incredibly resilient and can thrive for years with proper care.
SIX TIPS FOR SUCCESS
- Tip: After DAY 1, you'll retain a specific amount of mature starter from the previous DAY in the jar. To achieve the ideal weight, follow this tip: The new total weight should equal the initial weight of your jar (as recorded on DAY 1) plus the requested grams of starter you need to retain. Discard any excess until you reach the new total weight.
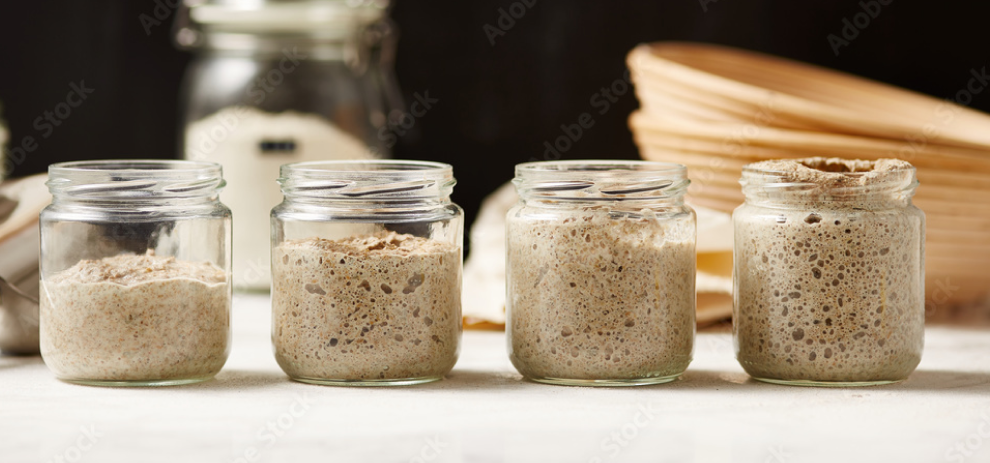
- Is the starter ready? A healthy, active starter will be characterized by numerous bubbles, a doubling in size within 6 hours after feeding, and a pleasant, slightly sour aroma—these are signs of readiness.
- Storing Your Starter: For those not baking regularly, you can refrigerate the starter with an aluminum lid, starting about 2 hours after feeding. To maintain its vitality, feed it once every 3 to 5 DAYs.
- Patience is Key: Starter development rates can vary due to factors such as temperature, types of flour, and water quality. If your starter is slow to activate, don’t worry; patience is crucial.
- Proper Storage: If you’re baking regularly, keep the kit in a clean, cool place away from direct sunlight. Continue feeding it according to the steps outlined for DAY 7—either once every 24 hours or twice a DAY (every 12 hours), depending on your baking frequency and your kitchen's temperature.
- If Baking Occasionally: For long-term storage, transfer the starter to the refrigerator and seal it with the aluminum lid.
What do I do on DAY 8 and beyond?
If your starter is ready, congratulations! You've embarked on an amazing, adventurous journey of artisan homemade bread. If it's not ready yet, don't be disappointed—simply repeat step 7 until it achieves readiness.
A mature sourdough starter, is incredibly resilient and can thrive for years with proper care.
Careful Cleaning: ‘Avoid using the dishwasher’ Handwash the kit to maintain its condition. Ensure the thermometer is handled with care; avoid tearing it off or exposing it to water and excessive moisture. Always dry the kit thoroughly after washing.
Congratulations, You’re now on the path to becoming a sourdough aficionado. With Spring Crust, you’re not just baking bread; you’re weaving a tapestry of taste, tradition, and togetherness—one loaf at a time.
We will be happy to answer any of your questions or concerns at support@springcrust.com.